
If you have never created a movie, the sheer technology of it might seem overwhelming. You might be surprised how simple it can be if you know just a few key features. If you have access to Movie Maker on a PC, then here is some information that will help you through.
How to Make a Video
Make a movie in four simple steps:
- Step 1: Get video, digital photos, and music into Windows Movie Maker
- Step 2: Start editing
- Step 3: Add titles, transitions, and effects
- Step 4: Publish your movie and share it with other people
With Windows Movie Maker in Windows Vista, you can quickly go from just watching movies to making your own great-looking home movies and sharing them with your family and friends.

Step 1: Get video, digital photos, and music into Windows Movie Maker
You need to import the video, digital photos, and music that you want to use in your movie.
There are two ways to get this digital media into Windows Movie Maker:
- Import video directly from your digital video (DV) camera. This is what you’d do if you taped your family vacation and wanted to get the footage onto your computer and edit out the boring parts.
- Import existing video files, digital photos, or music that’s already on your computer. You might want to use existing digital media files in your movie. If you only want to include your digital photos in your movie, this is the way you’d do it.

Edit without worry
When you make changes in Windows Movie Maker, the original files aren’t changed. So try different things when you’re making your movie—don’t worry, the original source files are safe.
Step 2: Start editing
After you’ve got your files in Windows Movie Maker, you can start editing.
Add items to the storyboard/timeline. Drag the videos, pictures, and music you want to use from the contents area to the storyboard/timeline. Everything that appears on the storyboard/timeline will be in your final movie.
Trim and arrange items on the storyboard/timeline. Next, trim the video clips on the storyboard/timeline to hide any video that you don’t want to show in your final movie. You can also move clips from one spot to another, split clips, or combine clips.
Step 3: Add titles, transitions, and effects
Now, it’s time to take your movie to the next level by adding special, personalizing touches, such as titles, transitions, and effects.
Titles and credits. You might want to add a title at the beginning of your movie that tells people a little bit about your movie, such as when, where, and what happened. And you can add credits at the end of your movie to tell the world who created and starred in it (just like you see in movie theaters and on DVDs).
Transitions. To make your movie look nice when one video or picture ends and another begins to play, add transitions between pictures, videos, and titles on the storyboard. There are more than sixty different transitions in Windows Movie Maker to choose from, so play around and use the transitions that look nice to you.
Effects. Finally, you might want to add some special effects to videos and pictures on the storyboard that’ll give your movie the appearance you want. For example, add one of the Film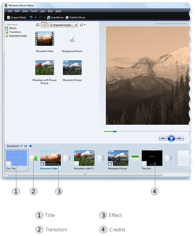 Age effects make it look like an old-time movie.
Here’s a picture that shows different transitions, effects, titles, and credits that are added to the storyboard
Narration. You can take it a step further by adding a narration to tell your story in your own words. This works well if you’re making a movie that just has digital photos. Remember, you can preview your project at any time by clicking the Play button under the preview monitor in Windows Movie Maker.
Step 4: Publish your movie and share it with other people
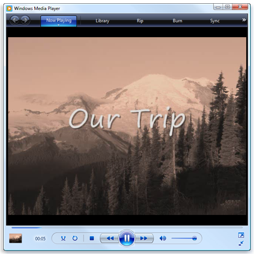
When you’re happy with your project, you’re ready to publish it as a movie. When you publish a movie, everything you added to the storyboard/timeline is combined and a new video file is created (this is your final movie file). You can then use a media player, such as Windows Media Player, to watch your movie on your computer.
By Lisa Rogers

The Education (K-12) Blogs and Special Ed Q & A are written and maintained weekly by Lisa Rogers with Educating Diverse Learners. Lisa received her M.A. in Special Education with an endorsement in the area of individuals with severe disabilities. Mrs. Rogers has also created products that have been used throughout the state of Texas for training purposes. Through the Association for Texas Professional Educators [ATPE], Ms. Rogers has produced an online course that targets the importance of visual strategies for student with autism spectrum disorders and just released her highly anticipated book titled: Visual Supports for Visual Thinkers.